


A masonry adapter is required for installation of a Vacu-Stack® or WeatherShield® on square and rectangular chimneys.
STEP 1: ASSEMBLE ADAPTER
Identify all stainless steel parts:
pipe with adapter plate, one threaded rod, one 1/2" diameter tube, one wing nut, two hex nuts, one flat washer, 2 lock washers.
Insert the threaded rod assembly through the two holes at bottom of adapter collar "B."

MASONRY ADAPTER Model AD
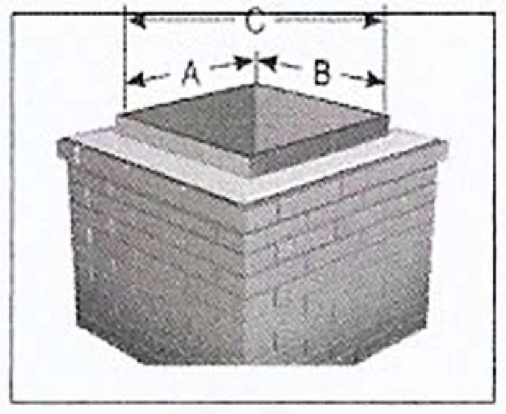
STEP 2: MEASURE
Measure inside of chimney opening "A" & "B" and diagonal distance "C." Adapter fastens to inside of chimney flue. The shortest dimension of "A" or "B" determines maximum adapter size that may be installed. Cover plate must be large enough to cover chimney opening.
STEP 3: ADJUST THREADED ROD
Adjust threaded rod so it projects distance "D" from side of adapter collar. "D" equals one-half times the difference between "C" (from Step 2) and collar diameter "E."
D=1/2 x (C-E)

STEP 4: PREPARE FLUE TOP
Brush clean top of flue and apply a bead of silicone caulking (available from most hardware stores and home centers).

STEP 5: POSITION ADAPTER
Position adapter on flue with fixed end of threaded rod touching on inside corner of flue. Reach into collar and turn wing nut clockwise until tube firmly grips opposite corner of flue. Do not over tighten.

STEP 6: SEAL COVER PLATE TO ATTACHED COLLAR
Apply a bead of silicone caulking at the location where the collar connects to the cover plate.


STEP 7: ATTACH CHIMNEY CAP
Insert the WeatherShield® into the collar. Seat firmly and seal top joint with silicone caulking.
CAUTION: Do not undersize. The size (area) of the chimney cap must not be less than the size of the appliance smoke outlet. For fireplaces, the size (area) must not be less than 10% of the front opening of the fireplace.